Customer Onboarding
The customer oboarding flow starts implicitly with the authorization flow via BankID in which they grant the institution permission to act on their behalf in their Safello account.
Once the BankID flow is complete and the institution holds the appropriate access token, the user details are retrieved to determine the status of the customer in the basic on-boarding flow
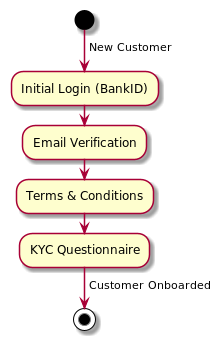
Because the access token identifies the associated customer implicitly, the Safello endpoints do not require (or allow for) the presentation of any such identifier explicitly.
The onboarding flow in detail
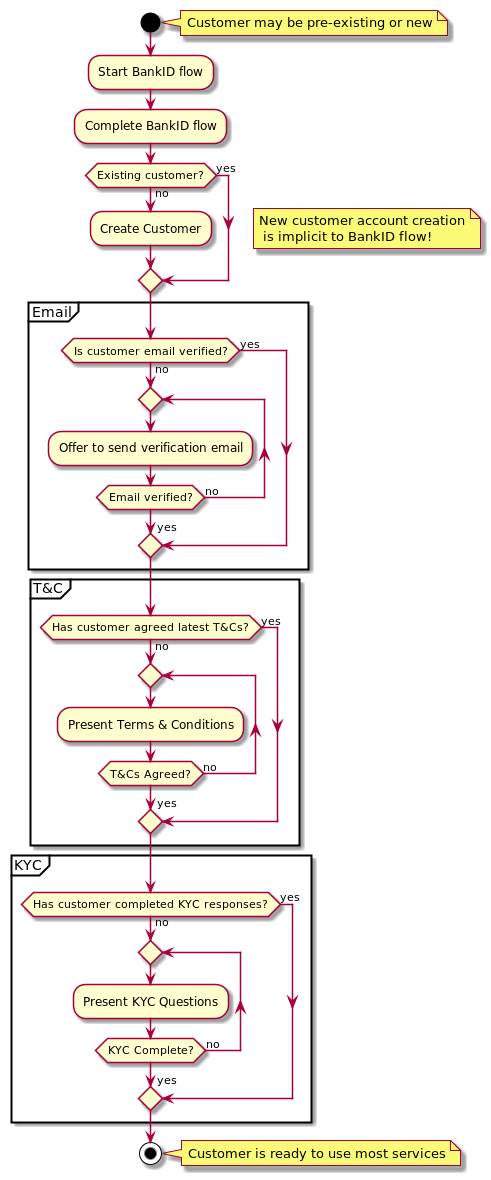
After authentication the customer's basic account details can be obtained from the /v2/account/user endpoint via a GET request.
Obtaining the credentialed account details example
curl \
  --silent \
  --header "Authorization: Bearer $ACCESS_TOKEN" \
  --header 'source-ip-address: 127.0.0.1' \
  --header 'source-user-agent: curl' \
  --request GET \
  --location 'https://api.s4f3.io/v2/account/user'
{
  "country": "SE",
  "email": "john.smith@example.com",
  "emailActive": false,
  "firstName": "John",
  "lastName": "Smith",
  "hasAcceptedLatestTerms": false,
  "language": "en",
  "level": 1,
  "safeEnvironment": false,
  "telephoneNumber": null,
  "tier": 3
}
Email verification
The email field in the account details represents the customer's supplied email, and the emailActive field indicates
whether the customer has verified their address or not. As an example:
{
  ...
  "email": "john.smith@example.com",
  "emailActive": false,
  ...
}
Here the email address has been supplied but the customer has not yet verified their email address.
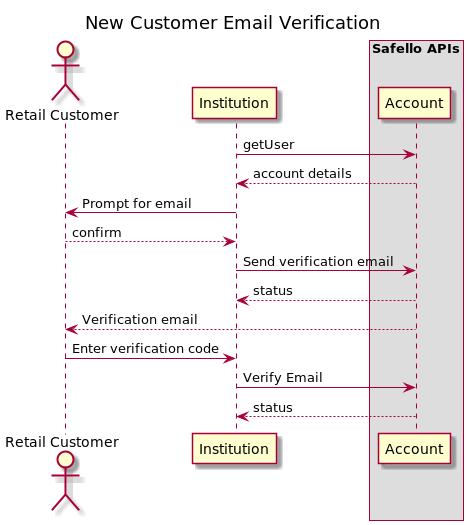
The customer should be prompted for their correct email address and this should be submitted via a POST to
the /v2/account/email endpoint.
Send verification email example
curl \
  --silent \
  --header "Authorization: Bearer $ACCESS_TOKEN" \
  --header 'source-ip-address: 127.0.0.1' \
  --header 'source-user-agent: curl' \
  --header 'Content-Type: application/json' \
  --request POST \
  --location 'https://api.s4f3.io/v2/account/email' \
  --data '{ "email" : "john.smith@example.com" }'
In order to verify that the customer controls the supplied email address, an email containing a verification code will be sent from the Safello servers to the customer's supplied email address.
The customer should then be prompted to enter the code contained within this email address, and the value of this
code submitted via a PUT to the /v2/account/email endpoint.
Verify email example
curl \
    --silent \
    --header "Authorization: Bearer $ACCESS_TOKEN" \
    --header 'source-ip-address: 127.0.0.1' \
    --header 'source-user-agent: curl' \
    --header 'Content-Type: application/json' \
    --request PUT \
    --location 'https://api.s4f3.io/v2/account/email' \
    --data '{ "code" : "3516" }'
If the email verification request returns a success (200) status code, the customer's email is verified. You may also
check this by re-requesting the customer's account details and validating that the email field contains the
customer-supplied value, and the emailActive field's value is true. For example:
{
  ...
  "email": "john.smith@example.com",
  "emailActive": true,
  ...
}
Terms and Conditions
New customers will not yet have accepted the terms and conditions. Pre-existing customers may not yet have accepted the latest set of terms and conditions. Either way the customer must be prompted upon login to accept the latest form of the terms.
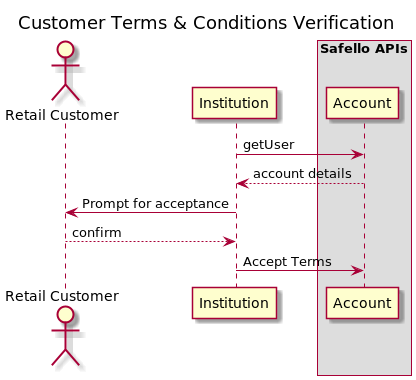
The customer must be prevented with the terms and must make an active choice to accept them. The customer may choose to also accept marketing emails, but must not be forced to do so.
The status of their acceptance will be represented in the user details response - for example:
{
  ...
  "hasAcceptedLatestTerms": false,
  ...
}
Upon confirmation of acceptance the institution must make a PUT call to the /v2/account/terms
endpoint to verify the customer's acceptance. If the customer does not accept our basic terms then
this call must not be made and the customer must not be permitted to access the Safello services
further until they have done so.
Accept Terms and Conditions example
For example, for a customer who accepts the terms, but does not accept our offer to send them marketing emails:
curl \
   --silent \
   --header "Authorization: Bearer $ACCESS_TOKEN" \
   --header 'source-ip-address: 127.0.0.1' \
   --header 'source-user-agent: curl' \
   --header 'Content-Type: application/json' \
   --request PUT \
   --location 'https://api.s4f3.io/v2/account/terms' \
   --data '{ "marketingEmails" : false }'
The endpoint will return a success (200) status if the verification has completed without error.
The user details should then reflect the updated status of the user:
{
  ...
  "hasAcceptedLatestTerms": true,
  ...
}
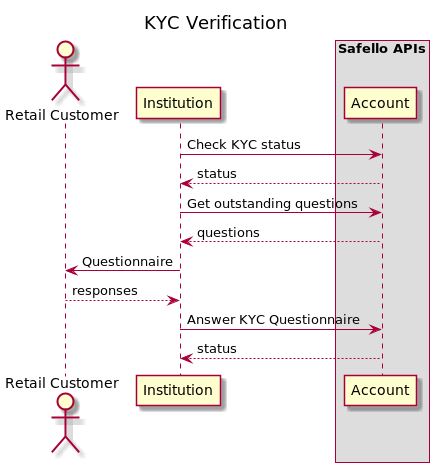
Know Your Customer (KYC) Questionnaire
The KYC flow is more complex. The customer's KYC status must be queried directly from the appropriate endpoint as it will not be included in the basic user details.
note
At the time of writing (2022-05-09) the KYC questions are not mandatory, so a newly created user's
requireKyc status will always be false. However their ability to trade over certain relatively low
thresholds will be impacted so it is better if they are prompted to respond to the questionnaire during the
onboarding process.
The customer's KYC status can be determined by making a GET call to the /v2/account/kyc endpoint.
Require KYC endpoint example
curl \
  --silent \
  --header "Authorization: Bearer $ACCESS_TOKEN" \
  --header 'source-ip-address: 127.0.0.1' \
  --header 'source-user-agent: curl' \
  --request GET \
  --location 'https://api.s4f3.io/v2/account/kyc'
The response will indicate whether the customer's KYC response is required in order to proceed.
{ "requireKyc": false }
The set of outstanding questions for the customer (there may still be optional questions when the requireKyc flag
is set to false) can be determined by making a GET call to the /v2/account/kyc-questions
endpoint. There are two query params that can be sent in as well. lang - which languange to get the question
in (sv or en are currently supported, defaults to en) and questionnaire - which set of KYC question to get (will default to BASIC).
Listing the outstanding KYC questions example
curl \
  --silent \
  --header "Authorization: Bearer $ACCESS_TOKEN" \
  --header 'source-ip-address: 127.0.0.1' \
  --header 'source-user-agent: curl' \
  --request GET \
  --location 'https://api.s4f3.io/v2/account/kyc-questions?lang=en&questionnaire=BASIC'
The questions to be answered will be returned as a list of multiple choice options. Some options may also allow for the entry of free text in association with that answer. Each question has an associated identifier and status (indicating if the question has been answered by the querying user), and each of the answer alternatives has an associated identifier. The question text will be localised to the language configured for the user.
[
  {
    "id": 11,
    "questionnaire": "BASIC",
    "question": "Are you a resident in another country than Sweden?",
    "alternatives": [
      {
        "id": 1,
        "answer": "No",
        "textAnswerOption": null
      },
      {
        "id": 2,
        "answer": "Yes, EU/EEA",
        "textAnswerOption": null
      },
      {
        "id": 3,
        "answer": "Yes, outside EU/EEA",
        "textAnswerOption": null
      }
    ],
    "questionVersion": 1,
    "status": "waiting"
  },

...

]
Typical rendering of a questionnaire entry example
Are you a resident in another country than Sweden?
⊙ No
⊙ Yes, EU/EEA
⊙ Yes, outside EU/EEA
To respond to the questions, make a POST to the /v2/account/kyc-questions
endpoint.
warning
When submitting responses, even if the questions are not mandatory, you must respond to all of the outstanding questions.
If incorrect identifiers are given or if some answers are omitted you will receive a 400 status response with
the payload reading {"message":null,"status":400,"code":"ACCOUNT_KYC_INVALID_ANSWERS"} and the given answers will
not be retained.
Submitting
curl \
  --silent \
  --header "Authorization: Bearer $ACCESS_TOKEN" \
  --header 'source-ip-address: 127.0.0.1' \
  --header 'source-user-agent: curl' \
  --header 'Content-Type: application/json' \
  --request POST \
  --location 'https://api.s4f3.io/v2/account/kyc-questions' \
  --data '{ "questionnaire":"BASIC", "answers" : [ { "questionId" : 11, "alternativeId" : 1 }, { "questionId" : 12, "alternativeId" : 1 }, { "questionId" : 13, "alternativeId" : 1 }, { "questionId" : 14, "alternativeId" : 1 }, { "questionId" : 15, "alternativeId" : 1 }, { "questionId" : 16, "alternativeId" : 1 }, { "questionId" : 17, "alternativeId" : 1 }, { "questionId" : 18, "alternativeId" : 1 }, { "questionId" : 19, "alternativeId" : 1 }, { "questionId" : 20, "alternativeId" : 1 } ] }'
After the answers have been successfully submitted the status field for each of the questions will now be
in the accepted state instead of the waiting state.
[
  {
    "id": 11,
    "questionnaire": "BASIC",
    "question": "Are you a resident in another country than Sweden?",
    "alternatives": [
      {
        "id": 1,
        "answer": "No",
        "textAnswerOption": null
      },
      {
        "id": 2,
        "answer": "Yes, EU/EEA",
        "textAnswerOption": null
      },
      {
        "id": 3,
        "answer": "Yes, outside EU/EEA",
        "textAnswerOption": null
      }
    ],
    "questionVersion": 1,
    "status": "accepted"
  },

  ...

]